Table of Contents
How To Care For Your Bromeliad
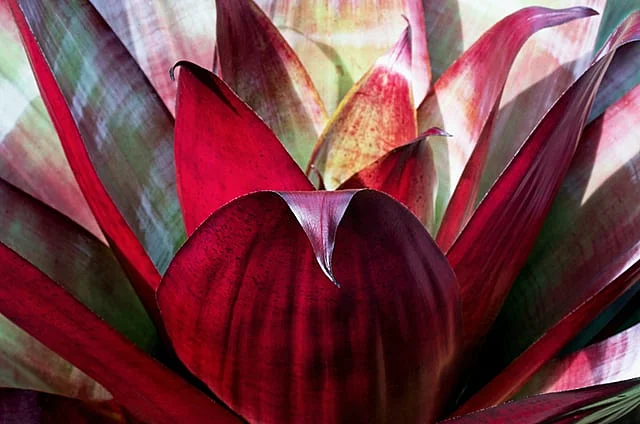
A bromeliad is a beautiful thing! It’s difficult not to love these brightly-colored plants. But, plenty of people don’t purchase them because when they hear that they originate from tropical climates, they wrongly assume that they must be high maintenance.
Actually, bromeliad’s do great as houseplants – and could even do well outdoors providing your area doesn’t freeze. All you need to do is understand proper bromeliad care, and you’ll be absolutely fine.
So, we’ve put together this helpful guide to teach you everything you need to know about bromeliad care; from the essentials to the good-to-knows!
What does your bromeliad need?
The first thing your going to need to know when caring for your bromeliad is how you’re going to keep it alive. This section will cover exactly that – the very basics in bromeliad care.
Light
You might think that as a tropical plant, the bromeliad requires lots of intense sunlight. This is actually not the case.
Whilst they do like bright sunny places indoors – so look for a window that faces the sun for the majority of the day if your growing the bromeliad as a houseplant – outdoors, they prefer slightly shaded areas without lots of direct sunlight.
Temperature
Whilst bromeliads do generally grow in tropical climates, they do not necessarily need scorching sun all day long.
That being said, they do require warmer conditions and should not be grown outdoors in areas that are likely to freeze during the winter months.
The bromeliad does not deal well with cold temperatures. If your local area is generally quite warm year-round though, the bromeliad does well outdoors.
If you are growing your plant as a houseplant, make sure that this plant is not left in areas with a draft or near open windows during colder times of the year.
Soil
It may come as a surprise to some, but proper bromeliad care does not require pots with deep soil.
Shallower pots are great for this plant, and soil isn’t necessarily the best for growing a bromeliad in either, because it is too dense and doesn’t offer the quick draining that the plant requires.
Purchase more porous mediums for these types of plants; look for an orchid mix or blend of barks if you are unsure. These should offer the draining that the plant requires.
Humidity
Bromeliads will grow best at around 60% humidity. That’s indoor or outdoor. Make sure that humidity in your area is regularly at around 60%, if it is not, consider using your bromeliad as a houseplant.
Now, maintaining this level of humidity can be difficult, especially during winter if your home is heated. The best thing to do is place a humidifier near to the bromeliad. You can also set the pot down over a tray that is partially filled with water.
This creates humidity and provides a moist environment for the plant – just make sure the roots do not touch the water in the tray, as this can lead to root rot.
How to water
The bromeliad takes in water through one of two ways, so it’s important to be familiar with both. Their roots take up water, but they also have a ‘cup’ or ‘tank’ which is in the centre of the plants leaves.
Both need to be addressed for proper bromeliad care and the following guide looks at both.
- Fast draining is important for bromeliad roots, as they are susceptible to root rot.
- Only water the medium in which they are planted when the top layer is dry to the touch to a depth of around 2 inches.
- Look at your plants ‘cup’. If it is full of stagnant water, this needs to be removed.
- Fill the cup regularly, preferably with rainwater if you can – this simulates how the plant would get water in its natural habitat.
As the bromeliad originates from tropical climates, this plant can withstand droughts quite well, but it has not adapted to lot’s of water. Overwatering will kill the bromeliad, so be careful and only water according to the guide above.
How to fertilize
Bromeliads are naturally slow growers, so don’t need regular fertilizing. During growing season you should fertilize with a 1/2 strength water soluble fertilizer roughly once per month however, just to help out.
It is possible to over fertilize the bromeliad, and you’ll usually notice it by its vibrant colors diminishing slightly, so refrain from fertilizing on your next scheduled date and wait until some of its color has returned.
Extra tips for bromeliad care
This next part deals with the things you might not need to know, but it will definitely benefit you if you do! These simple tips can help keep your bromeliad looking great and feeling great!
Pests and Diseases
Aphids and mites are the most common problems for bromeliads. Thankfully, these can be prevented easily with misting of the plant.
If an infestation does occur, wiping them away with a damp cloth should suffice. Only use insecticides as a last resort for bromeliads as they are sensitive plants when it comes to these sorts of treatments.
Any sort of root rot is common in bromeliads who have been overwatered or planted in a medium that is not quick draining.
As such, the only way to treat root rot is through prevention, so follow the above guidance carefully so you don’t inadvertently damage your plant beyond repair.
Pruning
You can cut back a bromeliad with a sterilized instrument if the plant is beginning to grow wildly. Just make sure you do so sparingly to avoid damaging the plant.
The bromeliad does tend to grow quite nicely though, without any real threat of it growing out of control.
Propagation
You don’t actually need to take any steps yourself to propagate a bromeliad. Their lifespans are short – usually only around 2 years – but they will produce ‘pups’ in that time, after flowering.
Simply remove these pups after they have grown to a reasonable size and replant in a medium that is well draining. It’s mother will unfortunately die, but by looking after its pup, you’ll grow a copy of the mother and the lifecycle will begin all over again.
Hopefully this guide has helped you to understand proper bromeliad care. And remember, by following the above steps and looking after the ‘pups’, you’ll never be without a bromeliad again!
Photo by David Clode on Unsplash


